Winkelwagen
Product
(Leeg)
Categorieën
-
CraftPro Frezen
- Groeffrezen
- Kantenfrezen
- Sponningfrezen
- Kopieer Frezen
- V-groef en Afschuin
- Zwaluwstaart- en Deuvelfrezen
- Verbindingsfrezen
- Afrond- en Leuningfrezen
- Holprofielfrezen
- Kraalprofielfrezen
- Profielfrees Ondersnijdend
- Profielfrezen met Onderlager
- Meubeldeurenfrezen, Profiel en Contraprofiel
- Bossing- Paneelfrezen
- Proefielfrezen Ramen- en Deuren
- Paneelfreesset
- T-groef, Slot en Schijffrezen
- Frees voor Brandwerende Tochtstrip
- Profielafdichtings Frezen
- Craft Pro Onderdelen
- Spantangen, 1/4 1/2 en 3/8 inch, 8mm, 12mm.
-
Professionele TCT Frezen
- Groeffrezen
- Sponningfrezen
-
Kantenfrezen
- 90° Kopieerfrees
- 90° Onderlager
- 90° Onderlager Low Profile
- 90° Dubbelsnijder
- 90° Onderlager V-groef
- 90° Dubbele Lager 2 Snijvlakken
- 90° Dubbele Lager 4 snijvlakken
- 90° Onderlager 3 snijvlakken
- 90° Groef / Kantenfrees
- Laminaat frezen
- Combi Inboorfrees
- Combi Afschuinfrees / Kantenfrees
- Miniatuur Kantenfrees
- Zwaluwstaartfrezen
-
V-groef en Afschuin Frezen
- Afschuinfrees / Fasefrees met lager
- Afschuinfrees / Fasefrees
- Afschuinfrees met lager
- Met Onderlager 3 Snijvlakken
- Afschuinfrees XL (voor dik hout)
- Afschuinfrees met Geleiding
- Afschuin Proefielfrees XL (grotere afschuiningen)
- Grafeerfrees
- V-Groeffrees
- V-Groeffrees met Bovenlager
- Combi Afschuinfrees / Kantenfrees
- Afschuinfreesset 30° en 45°
- Voor Alucobond
- Miniatuur Afschuinfrees
-
Kraalprofielfrezen
- Kraalprofielfrees Halfrond
- Kraalprofiel Halfrond met Onderlager
- Kraalprofiel Grote Radius
- Kraalprofielfrees
- Kraalprofiel Kwartrond
- Kraalprofiel Rond Deco Classic
- Kraalprofiel Halfrond Classic
- Kraalprofiel Halfrond Verzonken
- Kraalprofiel Classic
- Kraalprofiel Taps
- Kraalprofiel Decoratief met Lager
- Kraalprofiel Decoratief
- Kraalprofiel Drievoudig
- Kraalprofiel Dubbel
- Kraalprofiel Drievoudig Decoratief
- Kraalprofiel Drievoudig Multi
- Kraalprofiel Dubbel Soft
- Kraalprofiel Dubbel met Lager
- Spitskantfrees
- Spitskantfrees Dubbel
- 3 in 1
-
Holprofielfrezen
- Holprofielfrees met Geleiding
- Holprofielfrees met Bovenlager
- Holprofielfrees met Lagers
- Holprofielfrees
- Profielfrees Cavetto
- Profielfrees Cavetto met Lagers
- Holprofiel- Kantenfrees
- Holprofiel Groeffrees
- Holprofiel Dubbele Lager
- Holprofiel met Onderlager
- Holprofiel Halfrond Contra
- Holprofiel Groeffrees Dubbel
- Holprofiel Dubbel met Lager
- Holprofiel Drievoudig met Lager
- Kogelfrees
- Kogelfrees met lager
- 3 in 1
-
Afrond- en Leuningfrezen
- Kwartrond- Duivejager met 3 lagers
- Kwartrond- Duivejager met 2 lagers
- Afrondfrees Conisch
- Afrondfrees Ovaal
- Afrondfrees Geleiding
- Afrondfreesset Dubbelzijdig
- Afrond- Profielfrees
- Afrondfrees XL
- Plintenfrees
- Vensterbankfrees
- Kwartrond- Afrondfrees
- Miniatuur Afrondfrees
- Infrees- Afrondfrees met Bovenlager
- Profielfrezen Ramen- en Deuren
-
Profielfrezen
- Profielfrees Classic
- Profielfrees Classic Decor
- Profielfrees Classic Ovolo
- Profielfrees Classic met lagers
- Profielfrees Quirk Ogee met lagers
- Profielfrees Ogee met lagers
- Profielfrees Classic Panel Recht met bovenlager
- Profielfrees Classic Panel Rond met bovenlager
- Infrees- Afrond Profielfrees
- Profielfrees Classic Ogee
- Profielfrees Flat Ogee
- Profielfrees Ogee Panel
- Profielfrees Roman pin geleiding
- Profielfrees Roman Ogee
- Profielfrees Roman Ogee met lager
- Profielfrees Triple
- Profielfrees Elegant
- Profielfrees Wavy met lager
- Infrees- Profielfrees Ogee
- Profielfrees Miniatuur
- Schijffrezen, T-Groeffrezen
- Laminaat Frezen
- Miniatuur Frezen, Poppenhuis frezen
- Frezen Sets
-
Freesmallen
- Varijig
- Zwaluwstaart Freesmal CDJ300
- Zwaluwstaart Freesmal CDJ600
- Zwaluwstaart Freesmal DC400
- Pen en Gat Verbinding
- Freesmallen voor Werbladen / Keukenbladen
- Deuren en scharnieren
- Brievenbus
- Bogen, Ellipsen en cirkels
- Sloten
- Hoeken, Gaten, Kabels
- Decoratie, letter & cijfers, deurpanelen
- T-hoek
- Legplanken
- Trappen
- Reparatie
- Bovenfrees Accessoires
- Pockethole verbindingen
-
Machines en Veiligheid
- T11 Bovenfrees
- T10 Bovenfrees
- T5 Bovenfrees
- T4 Bovenfrees
- T20 Lamellen Frees
- Stofmasker, Air Pro MAX, P3 filter
- Stofmasker, Airshield Pro, P2 filter
- Airmask Pro geschikt voor P3 & A2 P3 filters
- Stofmasker, AIR STEALTH, P3 filter
- Airace Stofmasker
- Trend Stofzuiger Fijnstof
- Veiligheidsbril
- T60 Draadloos Lijmpistool
- Opbergen
- Freestafel
-
Trend Snappy Snelspansysteem
- Snappy Quick Chucks
- Snappy Sets
- Snappy Scharnier Centreerboor / Scharnierboor
- Snappy Verzinkboren
-
Snappy Boren
- Boor Metric (mm) HEX Aansluiting
- Boor Imperial (inches) HEX Aansluiting
- Steen Boren HEX Aansluiting
- Meerfasenboor HEX Aansluiting
- Glas Boren HEX Aansluiting
- Pocket Hole Boor HEX Aansluiting
- Boorrasp / Boorzaag HEX Aansluiting
- Deuvelboren HEX Aansluiting
- Boren Set HEX Aansluiting
- Losse boren & Accessoires
- Snappy Speedboren
- Snappy Slangenboren
- Snappy Proppenboor
- Snappy Forstner Boren
- Snappy Gatenboor Set met Houder
- Snappy Schroefbits
- Snappy Schroefbit Sets
- Snappy Bithouders
- Snappy Engineering Tools
- Snappy Losse Boren & Accessoires
- Snappy Etuis en Toolkits
- Snappy Schuurborstel
- Klem en Spanssystemen
- Meten en Markeren
- Slijpen en Wetten
- Boren
- Handgereedschap
- Reiniging en Smeermiddelen
-
Bovenfrees Losse & Reserve Onderdelen
-
Professional Frezen Onderdelen
- Reseve onderdelen 20/50
- Reserve Onderdelen 27/35 en 27/59
- Reserve onderdelen 3060 en 3061
- Reserve Onderdelen 338 en 339
- Reserve Onderdelen 347 en 349
- Reseve Onderdelen 753 tot 768
- Reserve Onderdelen 866 en 876
- Reserve Onderdelen 91/20
- Reserve Onderdelen Quad Groover
- Opspan-as met Vulringen
- Profielfrees Onderdelen
- Schijffrees Onderdelen
- Rozetten Frees Onderdelen
- CraftPro frezen onderdelen
- Kogellagers
- Delrin Kogellagers
- Kogellagers Rubber Sealed
- Kogellagers Trade Frezen
- Kogellager Sets
- Tussen Ringen
- Kogellager Fixing Pack
- Beschermringen
- Klemringen
- Blokkeringsring met Inbus
- Machine moeren
-
Professional Frezen Onderdelen
- Zaagbladen
- Catalogus & Boeken


Stappenplan badkamerkast
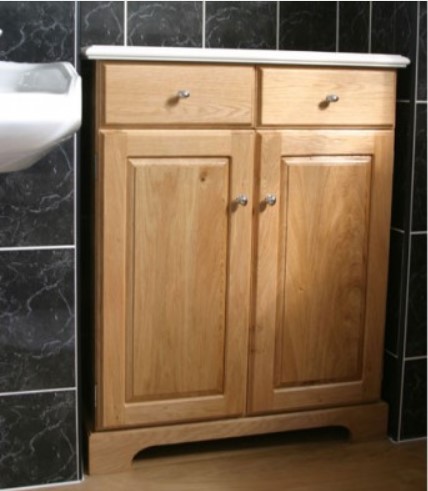
Bathroom Cupboard Routing Project |
||||||||||||||||||||||||||||||||||||||||||||||||||||||||||||||||||||||||||||||||||||||||||||||||||||||||||||||||||||||||||||||||||||||||||||||||||||||||||||||||||||||||||||||||||||||||||||||||||||||||||||||||||||||||||||||||||||||||||||||||||||||||||||||||||||||||||||||||||||||||||||||||||||||||||||||||||||||||||||||||||||||||||||||||||||||||||||||||||||||||||||||||||||||||||||||||||||||||||||||||||||||||||||||||||||||||||||
|
||||||||||||||||||||||||||||||||||||||||||||||||||||||||||||||||||||||||||||||||||||||||||||||||||||||||||||||||||||||||||||||||||||||||||||||||||||||||||||||||||||||||||||||||||||||||||||||||||||||||||||||||||||||||||||||||||||||||||||||||||||||||||||||||||||||||||||||||||||||||||||||||||||||||||||||||||||||||||||||||||||||||||||||||||||||||||||||||||||||||||||||||||||||||||||||||||||||||||||||||||||||||||||||||||||||||||||


